Conversion of a flashlight with a plug for 18650 batteries. Conversion of flashlights to lithium batteries. How to convert a flashlight to be powered by one battery, step-by-step instructions
Hi all! Many people have such a flashlight; it is sold in many stores under different names, but its design is the same. It is inexpensive, shines well, but there is a big drawback - it is powered by two R20 batteries, which cost several times more than this flashlight. I want to offer my way to solve this problem. Instead of batteries, I installed a phone battery in the case and removed the charging socket. First you need to disassemble the flashlight, remove the rubber cover from the handle and pull out the spring (terminal "-"). She won't be needed anymore.
Next you need to select a battery; it should fit in the handle of the flashlight. My battery fit perfectly. I attached 2 wires to the battery contacts using electrical tape so that the structure would be dismountable.


You need to solder a resistance to the LED block, because... our battery produces more than the 3 V required by design. You can calculate the resistance using an online calculator. Such LEDs must be designed for a voltage of 3 V and a current of 20 mA.

You can assemble the resulting structure.

At the end of the handle I attach the charging socket using glue.

All that remains is to make a hole in the rubber boot opposite the socket.

Now the flashlight can be used.

Connection diagram.

This modification allowed for significant savings on batteries. Even if you don’t have a battery, its purchase will pay off immediately, because its cost is approximately equal to the cost of 2 normal R20 batteries. In addition, the flashlight works on the battery until the end, then simply turns off, without significantly reducing the brightness. I used a battery that was far from new; the flashlight's operating time was 14 hours.
The article “Repair and modernization of LED lamps” examines in detail the issue of repairing and modifying the electrical circuits of Chinese LED lamps, replacing a failed acid battery with an analogue.
But there is another option for replacing the battery when repairing a flashlight - replacing it with a lithium-ion battery from faulty electronic devices. For example, a cell phone, camera, laptop or screwdriver. Batteries that no longer provide the required operating time of the device, but are still functional, are also suitable.
The first lithium-ion battery was released in 1991 by the Japanese corporation Sony. The nominal voltage of one battery cell is 3.7 V. The minimum permissible is 2.75 V. The charge voltage should not exceed 4.2 V at a charge current of 0.1 to 1 battery capacity (C). Lithium-ion batteries have virtually no memory effect and have a low self-discharge current, at room temperature no more than 20% per year. At the moment, in terms of technical characteristics, they are the best.

Previously, I had to repair and upgrade an LED flashlight in which all the LEDs burned out. After repairs, after several years of operation, it stopped shining due to the failure of the lead battery. As you can see in the photo, its body is swollen.
So the flashlight collected dust on the shelf until the lithium-ion battery from the camera failed. The analysis showed that the balancing and charge controller in the battery failed. Two battery cells were in good technical condition, which I decided to install in the flashlight instead of an acid battery.
The standard flashlight charger was not suitable for charging a lithium-ion battery, since it provided a constant charge current with an uncontrolled voltage. And for a lithium-ion battery, when charging, it is necessary to provide a charging current of 0.1-1C at a voltage not exceeding 4.2 V per cell.
Controller selection
for charging lithium-ion battery
You can make a controller yourself, but for sale, for example, on Aliexpress, they sell ready-made ones for 0.2-0.3 cents, assembled on the TP4056 chip or its analogues (ACE4054, BL4054, CX9058, CYT5026, EC49016, MCP73831, LTC4054, LC6000 , LP4054, LN5060, TP4054, SGM4054, U4054, WPM4054, IT4504, PT6102, PT6181, Y1880, VS6102, HX6001, Q7051).

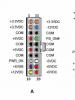
The simplest controller module was purchased on Aliexpress, the technical characteristics of which fully meet the requirements for charging the lithium-ion battery installed in the flashlight. Its appearance is shown in the photograph.

The controller is assembled according to the above electrical diagram. By changing the value of the resistor going from the second terminal of the microcircuit to the common wire, you can limit the maximum charging current.
The choice of the Li-ion battery charging current is determined based on two restrictions. The current value should be within 0.1-1 of the battery capacity (usually denoted by the letter C). For example, for a battery with a capacity of 600 mAh, the current should not exceed 0.6 A. Therefore, the value of the current-setting resistor must be 2 kOhm (the resistor should be marked 202). And do not exceed the current that the charger can provide. For this case, the current must be more than 0.6 A. The current is always indicated on the charger label.
| TP4056 Controller Specifications | ||
|---|---|---|
| Name | Meaning | Note |
| Input voltage, V | 4,5-8,0 | More than 5.5 V is not recommended |
| Output voltage, V | 4,2 | |
| Maximum charge current, A | 1,0 | Can be changed by R value from pin 2 |
| Minimum charge current, A | 0,03 | With less current it will go to sleep |
| Auto power off | There is | When charging current |
| Operation indicator | There is | Red is charged, blue is charged |
| Voltage monitor, V | 4,0 | If below, charging is turned on |
| Reverse polarity protection | No | Reversing the battery polarity is not allowed |
| Input connector | Micro-USB | There are contacts for soldering |
| Output connector | No | There are contacts for soldering |
| Overall dimensions, mm | 19×27 | |
| Module weight, g | 1,9 | |
It is worth noting that if the polarity of connecting the battery to the controller output is reversed, the chip will immediately break through and the voltage supplied to the controller will begin to flow to the battery terminals, which can damage it.
After charging the Li-ion battery, it is not necessary to disconnect the battery from the controller. In sleep mode or when no voltage is supplied to the controller, it does not discharge the battery.
This controller circuit does not include a shutdown function when the battery heats up above the permissible temperature. But it can be turned on if pin 1 of the microcircuit is disconnected from the common wire and connected to the terminal of the battery temperature sensor (these are found in the batteries of all cell phones).

If there is a need to use a controller that has protection against polarity reversal when connecting a battery and output short circuit, then you can use the controller shown in the photo.

In addition to the TP4056 chip, a DW01A (protection circuit) and a chip with two key field-effect transistors SF8205A are installed. The protection time is several minutes at a current of 3A. Other technical specifications have not changed.
In the flashlight, the batteries are connected to the controller using soldering. Therefore, a controller without a protection circuit was chosen, presented first in the article.
Installing a Lithium-Ion Battery
in LEL lantern
Before starting work, you need to check the functionality of the controller and battery.

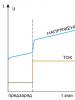
The controller can be supplied with voltage without load. In this case, the output voltage is set to 4.2 V and the blue LED on the board lights up. Next, you need to check the battery by connecting it to the controller output and charging it completely. The red LED will light up while charging, and the blue LED will light up when the battery is charging.
After charging, it is advisable to run test the battery, connect it instead of an acid one and see how long the flashlight illuminates. It worked for me for 10 hours and continued to shine. I didn’t wait any longer, since this time was quite enough for my tasks.
New electrical circuit of LED flashlight
At the next step, a new electrical circuit diagram of the flashlight is developed. The negative wire is common to all components and the battery. In the left position of switch SA1, its common contact connects the battery to the positive terminal of the controller. By connecting the middle pin to pin 3, voltage is applied to the narrow beam board, and with pin 4 to the diffuse light LED strip.

The SA2 toggle switch is used to select the battery from which the LEDs will operate. Since there were two batteries available, I decided to install both in the flashlight. There is no clear answer to the question about the admissibility of parallel connection of lithium-ion batteries without a special controller. Therefore, I decided to go the proven route and provided the ability to connect the batteries separately.
Separate connection of each battery made it possible not only to ensure their operation and charging in optimal conditions, but also to know during the operation of the flashlight how long it will still work. Knowing how much time was enough to operate from one battery, you will know how much more the flashlight can illuminate.
In addition, if one of the batteries fails, this will not lead to loss of performance of the flashlight. Two separate LED units and two batteries ensure you're never left in the dark.
Assembling a flashlight with a lithium-ion battery
Now everything is prepared and you can start upgrading the flashlight - reworking its circuit to work with a lithium-ion battery.

First, all wires are unsoldered from the switch and the old charger board is removed.

The body of the modernized flashlight had a compartment designed for a short power cord, which was closed with a folding bar with diffused light LEDs. The SA2 toggle switch for battery selection was inserted into it.

To secure the batteries, double-sided tape was used in the form of two strips. You can also secure the batteries using silicone.

Before attaching the batteries and the controller board, wires of the required length were first soldered to them with a soldering iron. Due to the fact that two batteries were not conveniently placed in one half of the flashlight body, I installed them one in each half of the body. The controller board was secured to the case using two screws with M2 nuts.
When soldering wires to the terminals of the battery, care must be taken so that the free ends of the wires do not accidentally touch and short-circuit its terminals.

The photo shows the lantern after installation. All that remains is to check the operation of its components and assemble it.

It is impossible to measure the charging current by connecting an ammeter to the open circuit after the controller, since the internal resistance of the device is large and the measurement results will be incorrect. I have a USB tester with which you can find out the voltage supplied from the charger, the current charge current, the charging time and the energy capacity that the battery has received. The tester showed that the controller charges the battery with a current of 0.42 A. Therefore, the controller charges the battery normally.

After assembling the flashlight, it turned out that its red body does not transmit blue light and it is impossible to know when charging is complete.

I had to disassemble the flashlight and make a slot hole in the area where the indicator LEDs are located.

Now that the battery is charged, the blue LED glow is clearly visible.
About choosing a lithium-ion battery for a flashlight
Any lithium-ion battery is suitable for upgrading a flashlight, regardless of the material from which its positive electrode is made and the form factor (shape and geometric dimensions). The battery capacity (expressed in Ah) also does not matter, just the larger it is, the longer the flashlight will shine.
It should be noted that if a battery that has been in use for a long time is installed in the flashlight, then its actual capacity, as a rule, is significantly less than indicated on its label.
You can check the feasibility of installing an old battery in a flashlight by measuring its capacity while charging, which will require the presence of measuring instruments, at least a USB tester. Or charge the battery completely, connect it to the flashlight's LED board and check whether its operating time is sufficient.
If the battery is insufficient in capacity, you will have to purchase a new one. The most suitable for the flashlight is the popular Li-ion battery type 18650.
About the built-in protection circuit in Li-ion batteries
There are lithium-ion batteries that have a built-in protection circuit board (PCB - power control board) against short circuit, overcharge and deep discharge. Such protection is mandatory installed in the batteries of expensive equipment, for example, cell phones, cameras, laptops.
A round-shaped protection board can also be installed at the end of a AA battery. In this case, the battery is slightly longer and has the inscription “Protected” on its case.

The photo shows an open cell phone battery case. It has a printed circuit board with a protection circuit. When used to install a cell phone battery in a flashlight, this circuit will serve as additional protection, therefore, if it is working, it should not be removed.
Solder the wires, observing polarity, to the outermost contacts, next to which there is a polarity marking.

The protection circuit, unlike the controller, does not limit the charging current, but only protects the battery. This is the difference between these nodes.
How to restore a Li-ion battery
after deep discharge
If a Li-ion battery quickly charges and discharges, it means it has exhausted its resource and cannot be restored.
If the battery does not have a protection circuit and the voltage at its terminals is zero, then the battery cannot be restored either.
If the battery has a built-in protection circuit and it does not accept a charge, and the voltage at its terminals is zero, then you can try to restore it.
The reason for this behavior may be a deep discharge as a result of long-term storage of the battery in a discharged state. If the voltage at the terminals of the can becomes less than 2.8 V, then the protection system regards this as an internal short circuit and, for safety, blocks the possibility of charging it.

To understand the reason, you need to measure the voltage at the battery terminals with a voltmeter. If the value is less than 2.8 V, then apply a voltage of 4.2 V from the controller, observing the polarity, directly to the battery terminals. There is no need to disable the battery protection circuit; it is safe for it.
If the charging current has started, then after ten minutes you need to disconnect the controller from the battery and again measure the voltage at its terminals. If it becomes more than 2.8 V, then try charging through the protection circuit. If the voltage is close to zero and does not increase, then the battery is faulty and cannot be used for further use. If the voltage increases, but does not reach 2.8 V, then continue direct charging.
If the battery begins to charge through the protection circuit, it means it is working. Otherwise, the scheme must be deleted. A protection circuit is not required to use a flashlight battery.
In this simple way, you can test the LI-ion battery and, if possible, restore its functionality.
Conclusion
Replacing the acid battery in an LED flashlight with a lithium-ion one allows you to solve the main issue - the performance of the flashlight for a long time with infrequent use, since the self-discharge of the battery does not exceed 2% of its capacity per month.
In addition, if you have a lithium-ion battery from any failed electronic device, you can save money and the flashlight will become much lighter.
Selecting and purchasing a flashlight is a difficult and tedious task. At least for me. I approach this matter with all meticulousness and responsibility. It is necessary to take into account all the advantages and disadvantages of the product. Type and capacity of batteries, parameters, weight, degree of water resistance and much more. So that he does not fail at the most inopportune moment. I wanted to buy a small pocket flashlight, waterproof, powered by a single 18650 battery. However, I could not find the desired product in local stores. I was already thinking about ordering from an online store and, after waiting 2-4 weeks, getting what I needed... But suddenly I came across something that almost suited me. Almost. The flashlight had the dimensions I needed and all the necessary qualities, but there was one “but” - it worked on three AAA batteries (pinky).

Having a special container with four constantly charged 18650 batteries in my backpack, I absolutely do not want to use other batteries. Moreover, such small and not capacious ones as little ones. But there is always a way out! Having examined this flashlight in the store, a modification scheme immediately emerged, and without thinking twice, I purchased it with the goal of remaking it in my own way in the near future.
Will need
- A burr machine with a cutting disc (or an emery machine).
- Soldering iron, tin and flux.
- Plastic tube (for housing insert).
- Aluminum self-adhesive foil.
- Scissors.
- Stationery knife.
- File.
- Sandpaper (or sanding cloth).
- Secondary glue.
Flashlight conversion
The main problem is that the flashlight’s “native” power supply (the housing in which three AAA batteries are located) is slightly wider, and one and a half centimeters lower than the 18650 battery.
This means that the body of the flashlight itself will be too small in height for 18650. In terms of voltage, 18650 is almost identical to three little finger batteries, 18650 produces 3.7 volts, and three little finger batteries give a total of 3.6 volts (1.2 × 3 = 3.6) . This means that if the body is too small, you need to lengthen it. It was quite problematic to find a suitable insert tube that would fill the extra space between the battery and the walls of the flashlight. In the end, I was never able to get a suitable insert... I simply took a more or less suitable tube that included 18650 and, installing it on a drill, removed the excess thickness from the rotating workpiece from the outside with coarse sandpaper! So, let's disassemble the flashlight. Unscrew the front and back parts of the flashlight from the middle one and set it aside. Using a burr with a cutting disc, we saw the middle part of the flashlight body into two equal halves.

We sand the sawn edges with sandpaper so that they become even and smooth.

Next, we insert the liner tube into the front part of the flashlight with a reflector screwed onto it, and put the back part on top with the bottom and button screwed onto it. The result is a new, elongated body that fits the width of 18650.


Now let’s adjust the height, insert the battery into the case, measure out the excess on top, take out the liner and cut off the measured edge with a utility knife.


Also in the design of the flashlight, inside the body, there are two metal rings and a metal strip that connect the plus and minus on the switch button. Naturally, after lengthening the body, the metal strip became too short for the new design. We also had to adjust the rings to fit the liner tube.

The layer of soft plastic was quite easily and quickly removed with a file from the edges of the liner, where the ring should sit.


The second, the front ring, was inserted inside the front of the flashlight, where the reflector, lens and LED are located, so there was no need to mess with it. Let's do it simpler with the metal strip connecting the rings; Simply stick a strip of self-adhesive aluminum foil onto the liner.

We put the back ring on the prepared back part of the liner.

Now let’s take a look at the “head” of the flashlight. On the former power supply, with pinky batteries, there was a small bulge on the positive contact that was in contact with the positive. On the 18650 battery, both contacts are flat, so I had to solder the same spring to the positive contact of the front part of the flashlight as is on the negative, rear part.


Now let's put the new body together.

All the details fell into place like family! All that remains is to drip super glue into the joints between the liner and the sawn edges of the body to restore the tightness. There is still space left, or rather, it turned out to be a groove that was formed after installing the sawn ends of the old case on the liner. This is an individual matter for everyone; Before gluing all the parts, you can fit a piece of tube with suitable parameters to this place. I decided to just wrap a little tape and black insulating tape there; Might be needed somewhere.

Thus, we “transferred” this device from three batteries to one, equal in voltage, thereby saving ourselves from the tedious charging of the power supply with small and low-capacity batteries.

The above changes did not in any way affect the quality of the flashlight (brightness and water resistance). Except that it has become one and a half centimeters longer.

The already mentioned PopLite flashlight suited everyone more than once, except for the power source and everything connected with it: AAA batteries are expensive and inefficient, while Ni-MH batteries have a lower voltage, which is why the flashlight with them shines noticeably worse. And the operating time is not encouraging - the capacity of such a battery is, at best, 1000 mAh, which means that at full power they last only 2 hours.
And the most unpleasant thing is that most chargers are designed to simultaneously charge 2 or 4 batteries, which means one will have to be charged in tandem with a battery from another set. And since it is unlikely that their degree of discharge is the same, one of them will be undercharged, and the second will lose a little capacity due to the so-called “memory effect” found in Ni-MH batteries. As a result, a set of batteries is not enough for two seasons...
So after using modern lithium batteries, it was decided to convert these flashlights to lithium: the voltage of the lithium element is 3.7-4.2 volts, that is, exactly like 3 ordinary batteries! The only thing left to do is find AAA-size lithium batteries (model 10440), and as always, they were found from the Chinese on AliExpress. A month of waiting - and a pack of batteries in my hands. Well, let's start the rework right away. After all, you don’t even have to disassemble the lantern much to do this! All you need is a couple of pieces of copper wire, tweezers, scissors and a soldering iron.
First you need to open the battery compartment of the flashlight and remove the batteries.

Now, using tweezers, carefully remove the double contact pads - they are not connected anywhere


The crucial moment is to cut the contact strips exactly in half with scissors. I cut with metal scissors, but if you don’t have them, you can use regular scissors; the strips are made of soft brass.


Now use tweezers to lift the remaining contact strips. Be careful - they are soldered with wires to the board!


Now we install the halves of the planks in their new places, without recessing them completely

We prepare a thin wire - we form a “wave” so that the strips can move independently.

Carefully solder the wire to the strips and press them into place. Soldering must be done carefully so as not to overheat the contact and melt the flashlight body.


Now everything is ready, you can install batteries - and an arbitrary number!

Since the batteries in the flashlight are connected in parallel, in order to avoid compensation currents, you should not mix charged and discharged batteries.
With a full set of batteries, the total capacity was 1800 mAh, that is, almost twice the maximum possible for Ni-MH batteries, and 2.5 times more than it was. And the operating time of the flashlight has increased by as much as 3 times, but now ends not with dim light, but with a complete and unexpected shutdown - for protected batteries, the battery protection device turns it off to avoid overdischarge. (this is precisely why you need to buy protected ones - lithium batteries really don’t like overdischarging!) So a few spare batteries will be very useful.
In the same way, you can convert any 3-battery flashlight, both with AAA and AA elements. The resulting advantages are weight, operating time and cost of the cycle, but the disadvantages are that lithium performs worse at subzero temperatures, so the converted flashlights are not suitable for a ski trip at -30.
Lithium batteries, now it's time to put this scheme into action by upgrading some flashlights. Next, see a couple of applications of memory boards with TP4056 in flashlights:
The batteries were taken from old cell phones, found with the same capacities, balanced and soldered into a block. In the first option, 1.5 A, in the second, 1 A. They charge quickly - approximately 1-3 hours, depending on the current used.

Next, I started converting another old camping flashlight for a 18650 lithium battery, I drew a signet for it, it came out almost like the original, but smaller. I tried charging, it works. I'll collect the whole lantern.

But I finished another old camping lantern. It is possible to change lenses for different focusing of the light flux. I replaced the acid battery with a 18650 type battery and added a charger on the same TP4056, the capacity of the used battery is 1.3 A:


Another case. They gave me a good case from an ancient incandescent flashlight, rechargeable from the mains.

The gel battery built into it was hopelessly dead for a long time. After some thought, it was decided to build into it a block of parallel lithium batteries, 4 pieces of 800 mA each, and expand the functionality by integrating two LEDs into the housing for 60 mA and 150 mA.

In place of the removed retractable plug, an additional aluminum plate-radiator was cut out and an SMD LED with an operating current of 150 mA was screwed on. And in place of the former light bulb, an 8 mm round LED rated at 60 mA was installed.

There was a lot of free space left inside, so a ready-made memory was built into the flashlight, again for TR4056. The LEDs on the charger board fit perfectly into the hole of the former power LED. For these charge indication LEDs, a conical indicator was machined from plexiglass and glued into the case. The result is a compact and resource-intensive (3.2 A) pocket flashlight with recharging from 5 V.

Protective plexiglass was also added to the body to protect the LED from dust. And this is a disassembled body, for a clearer visual acquaintance with the contents of the converted flashlight. There is still empty space left; it is quite possible to add a boost converter for recharging a cell phone.

In this way, old electronic structures and devices can be given the opportunity to continue to serve, using a modern electronic base in a new technical quality. And all this can be done with a small, cheap 4056 microcircuit. I was with you Igoran.
Discuss the article CONVERTING FLASHLIGHTS WITH LITHIUM BATTERIES