Starline c6 key fob operating instructions. Functions and characteristics of the Starline Twage A6 car alarm with two-way communication - user manual. To the regions of Russia
StarLine Twage C6 is a new generation alarm model, developed in 2008, with a two-way communication channel. The new original key fob with feedback and LCD display has a 70% increased warning range compared to series A and B systems. The original SLD Military™ dialog code is used for control.
The full list of security and service capabilities of StarLine Twage C6 includes more than 50 functions: turbo timer mode, 2-step engine unlocking when the security mode is turned off, a programmable interface for connecting various security sensors (shock, tilt, pressure, microwave, ultrasonic, etc.), several options for emergency alarm deactivation with the ability to set a 1, 2 or 3-digit personal code, a convenient programming algorithm with indication of the number and status of the variable function on the LCD indicator of the key fob with feedback, 4 additional control channels with programmable operating algorithms and much more.
Equipment:
Customer reviews about StarLine C6:
| Write your review about StarLine C6 | ||
Our tips, which I hope will help you choose a car alarm:
1. Take only reliable, time-tested and well-proven companies.
2. Don't skimp on additional features. Try to take car alarms with two-way communication and with auto start (if necessary), because the cost of installing any car alarm is approximately the same and amounts to 4000-6000 rubles. Therefore, it is not profitable to take a simple car alarm for 1000 rubles and pay 5000 rubles for installation. It is much more profitable to take a good, modern and reliable alarm system for 5000-7000 rubles and install it for the same money.
3. Do not look at the country of manufacture of the car alarm. Basically they are all made in China, but that doesn’t make them any worse.
4. It is always advisable to install an additional secret in parallel to the car alarm, which does not depend on the car alarm, because the key fob can be stolen, picked up or scanned.
5. You must always understand that no matter what the car’s security system is, it won’t be difficult for a good specialist to steal a car. You can steal almost any car, another thing is that why bother with cars that have good car alarms and mechanical anti-theft devices, when there are many cars without alarms at all.
6. You also need to understand that car alarms still signal more, but you must act yourself. If your car alarm has responded (beeped or the key fob beeped), then you need to run to the car as quickly as possible.
7. Try to buy new car alarm models. They are usually more sophisticated, have more functions, and their price is usually no more expensive than older models.
8. The quality of the final product (car alarm, its installation and configuration) greatly depends on the skill of the installer and on the use of non-standard solutions, which greatly complicates the theft of a car.
9. Take common and well-known companies. They are more reliable. The main thing is that the car alarm does not go off on the road.
10. Some car alarms have discounts. Of course, these are worth taking. You can save a lot of money, especially on expensive models.
11. For many modern car alarms, you can purchase a satellite module, which will send the car’s coordinates via cellular communications. Previously, such modules (or alarms in general) were quite expensive, but now the price for them has dropped significantly. Therefore, if before it was not advisable to take them, now it is possible to take them.
| Subject | Author | date |
| C6 A and VUS DLS C 350. Car Skoda Octavia Tour. The speakers do not fit into the standard sockets in depth. What should I do - put rings or cut off a piece of the window regulator mount from behind? What are spacer rings made of? I live in Kazakhstan, I’m afraid that something will happen at the car service center. Thank you very much!">Hello! I bought a DLS front C6 A and VUS DLS C 350. Car Skoda Octavia Tour. The speakers do not fit into the standard sockets in depth. What should I do - put rings or cut off a piece of the window regulator mount from behind? What are spacer rings made of? I live in Kazakhstan, I’m afraid that something will happen at the car service center. Thanks a lot! | Dima | 2007-09-13 21:39:03 |
| C6 92 or DLS 962? In terms of sound, bass is not needed... ">Which is better Nakamichi SP- C6 92 or DLS 962? In terms of sound, bass is not needed... | Marat | 2007-09-07 21:49:58 |
| Thank you for the answers. I would like loud, high-quality sound and a reliable manufacturer. If you install two subwoofers, do you need two ac-l. In your opinion, does the set nakamichi sp-c692, dls-ma41, Magnat Xpress12 in the case make sound? Auto VAZ 2110 . | ALEXEI | 2007-09-06 21:02:58 |
| C6 92.">Front-DLS R6A. Rear-DLS 962 or Nakamichi SP- C6 92. | KOS | 2007-09-01 15:31:16 |
| C6 92 to them amplifier DLS MA 41, and JVC KD-AVX2EE. How do you think this will all play out? or recommend some other DVD/MP3/CD player for all this, budget up to 17 thousand rubles? "> I want to install DLS Reference 6.3 and Nakamichi SP- C6 92 amplifiers DLS MA 41, and JVC KD-AVX2EE. How do you think this will all play out? or recommend another DVD/MP3/CD player for all this, budget up to 17 thousand rubles? | Marat | 2007-08-24 18:21:11 |
| C6 A, since the R6A are pricey. Well, these are also pretty good - I liked them. I listened to all sorts of subs and finally settled on Hertz (10" sony cdx-gt500 cdx-gt300.> I bought speakers C6 A, because the R6A is pricey. Well, these are also pretty good - I liked them. I listened to all sorts of subs and decided on Hertz (10") - a little later. In the meantime, I’ll have to change the head, since there are not enough linear outputs in it, and there is no control over the sub. So now the question is about choosing a radio. I was thinking about the Sony CDX-GT500 or CDX-GT300. What can you say about them? Can you recommend any analogues from other manufacturers? | Stanislav | 2007-08-05 18:45:38 |
| C6A..." Another question: why Nakamichi SP- C6 92, and not DLS 960 (the latter have lows starting from 30 Hz, Nakamichi - from 40 Hz), which GU is better to buy instead of Panasonic for about the same money? ">KOS, thanks for the recommendation on "Hello! Car Peugeot 406 (sedan), Panasonic CQ 7303N radio, DLS front speakers C6 A..." Another question: why Nakamichi SP- C6 92, and not the DLS 960 (the latter have lows starting from 30 Hz, Nakamichi - from 40 Hz), which GU is better to buy instead of Panasonic for about the same money? | Oleg | 2007-07-28 16:55:29 |
| C6 92, without other options... Criterion: deep and high-quality bass to pump up the sedan... (you need speakers that would ">Greetings! I'm going to put ovals in the rear under the JVC J737 radio, there will be no amp, no subwoofer... .what do you recommend installing: DLS M1369 or Nakamichi SP- C6 92, without other options... Criterion: deep and high-quality bass to pump up the sedan... (we need speakers that would “replace” the sub...) THANK YOU in advance! | Alexander | 2007-06-26 12:59:34 |
| C6. Or would you recommend something else to take? Thanks in advance for your answer.">Good afternoon! Please tell me if I should take this in the car: subwoofer - DLS Nobelium 10, amplifier (1 channel) - DLS MAD 11, amplifier (4 channels) - Soundstream LW4.580, speakers (rear) - DLS 962, speakers (front) - DLS C6. Or would you recommend something else to take? Thanks in advance for your answer. | Alexander | 2007-06-01 19:52:50 |
| C6 92. ">Take Clarion DXZ675USB or Clarion DXZ765MP, it will be much cooler. As for the rest, everything is correct, but it’s better to take the acoustics in front - DLS R6A or RS6A or B6A. Rear - Nakamichi SP- C6 92. | KOS | 2007-05-10 17:23:50 |
The A6 Starline anti-theft system is no longer available today. Despite this, the security complex has advanced functionality, including two-way communication and the ability to automatically start the engine.
[Hide]
Features of the Starline A6 alarm system
The main feature of this model is the presence of dialogue encoding used when transmitting signals.
This ensures maximum reliability and difficulty in intercepting them.
Specifications
- The main properties of this security system model:
- transmission of pulse data via two-way communication channels from the key fob to the microprocessor module is carried out at a frequency of 433.92 MHz;
- the maximum operating range of the communicator in command sending mode is 600 m;
- the largest radius of operation of the key fob when receiving signals is 1.2 km;
- the operating range of the spare key fob for driving a car is 15 m;
- anti-theft system with automatic engine start can operate in a temperature range from -40 to +85 degrees Celsius;
- installation and use of signaling is possible on cars whose electrical voltage is 9-18 volts;
- when the protection mode is turned on, the security complex should consume no more than 20 mA of current;
- to power the electrical circuit through which the siren is connected, 2 amperes of current will be required;
- the current consumed by the power unit blocking line varies around 40 amperes;
- The main communicator is powered by an AAA power supply rated at 1.5 volts;
The spare key fob operates using 3 V CR2032 batteries.
Equipment
- Components and devices included with Starline Twage:
- Technical manual that allows you to correctly connect and operate the security system after installation.
- Microprocessor module with a set of elements for installation and fastening.
- The main communicator for controlling and programming options is equipped with a display.
- Two-level shock sensor.
- Antenna adapter with transceiver.
- LED light bulb designed to determine the operating mode of the A5 Starline signaling system.
- Service mode button, can be used for emergency shutdown.
- Toggle switch to enable the Anti-Robbery function.
- A relay designed to configure and control the autostart function of the power unit.
- Two holding mechanisms equipped with 30 A fuses.
- Limit switch for installation on the hood or tailgate.
Photo gallery
Photos of the elements of the security complex are given in this section.
Full set of signaling Communicator for system management
Main functionality
All system options can be divided into two categories - protective and service. The first ones are intended for setting the vehicle security parameters. The latter must be used when servicing and adjusting control options.
Protective functions
Functional:
- the ability to be activated by sound and light alarms if the security controller is turned on;
- transmission of pulse warning signals about the activation of the siren to a communicator equipped with a screen;
- remote activation of the Panic function, which allows you to temporarily activate the alarm mode upon command;
- power unit blocker mode;
- the Anti-Robbery option can be turned on using a special toggle switch or button, as well as by command from a pager;
- the possibility of blocking the power unit with its further preservation when the anti-theft system is removed.
Service
Description of service options:
- silent car protection;
- protection of a vehicle with a running engine;
- the ability to activate the protection mode without a communicator;
- options for automatic activation of security in case of accidental shutdown if no car door was opened;
- the ability to activate protection automatically;
- option for the system to independently check all its components when protection is disabled or activated;
- the ability to activate protection with the sensitivity controller disabled;
- silent shutdown of the protective function;
- remote activation or disabling of the sensitivity controller by levels;
- remote control of the standard central locking;
- option to control door locks from ignition activation;
- two-stage opening of door locks;
- Comfort option, which allows you to automatically raise the windows and close the sunroof when the security system is turned on;
- Valet service mode;
- emergency shutdown of the protective mode using a personal password;
- the presence of four additional channels for controlling electronic devices and car equipment;
- the ability to control lighting fixtures in the cabin;
- vehicle search function;
- the consumer can remotely program the key fob and delete information about old communicators from the microprocessor memory;
- option to delete installed settings to factory settings;
- car owner call function;
- determining the temperature level in the car interior;
- the key fob display displays information about the current time;
- presence of alarm clock and timer;
- function of monitoring and controlling the battery discharge of the main remote control;
- illumination of indicators on the communicator display.
How to install an alarm
The security system is installed in accordance with the requirements specified in the service manual.
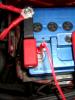
Installation of the anti-theft system must be carried out with the battery disconnected.
This will avoid malfunctions of standard equipment. It is recommended to protect all electrical alarm circuits with safety devices.
Connection diagrams
Electrical diagrams for connecting elements are given in this section.
Identification of buttons on the key fob
Key fob programming
To bind the communicator, you need to configure the operation of the first key:
- Button 3 is pressed several times, the user must move the cursor on the key fob screen to the position of the required command. If the key will be used to control the protection mode, it must be set to the corresponding indicator position. To change the direction of cursor movement, you need to pause briefly between clicks.
- After selecting an option, the button must be pressed for 6 seconds. You need to wait for a double and then a triple beep.
- To enable the function, press the first key.
Setting up the second key is done in the same way:
- By clicking on the third button, the cursor is moved on the display to the required position.
- After selecting the option, the second button is clicked.
After binding, the clock parameters are configured:
- To complete the task, the third key is clicked. It must be pressed until the key fob emits two short beeps.
- The clock indicator on the display will start flashing. To increase parameters, use the first key, to decrease - the second. To change values quickly, this button must be held down.
- After changing the settings, the minute parameters are adjusted identically. To do this, click on the third button.
- To exit the settings mode, press the third key. It must be held until the communicator beeps.
Programming alarm clock parameters:
- To complete the task, the third key is pressed. It must be held until the communicator plays a double signal.
- The third button is pressed to move the cursor on the screen to the alarm position. The clock indicator will flash. The first button is used to increase the parameters, and the second button is used to decrease them.
- After setting the hours, the minutes are adjusted. To do this, click on the third button.
- When the parameters are set, you need to click on the third button, so the system will go to the menu for activating or disabling the option. Turning on is done by clicking on the first key, and turning off is done by clicking on the second. To exit the setup menu, use button 3; the communicator should emit a beep.
Recording codes
Programming new remote control codes is done as follows:
- The key is inserted into the lock and turned to turn the ignition on.
- The service key is pressed for six seconds. You can release the button after the siren sounds four times.
- The first and second keys of the main communicator with a screen are pressed until the siren plays a sound signal. This indicates that information about the first remote control has been added to the system. To bind a spare communicator, click buttons 3 and 4.
- The previous action is repeated for each added communicator. The siren will play signals to confirm the recording. You need to have time to bind each key fob within six seconds after recording the last device. Otherwise, the alarm will exit the programming menu, which will be indicated by five headlight flashes.
- When the procedure is completed, the ignition is turned off.
User Viieer Aleks talked about independently recording key fob codes into the memory of the Starline A6 microprocessor module.
Setting up autorun
This model does not provide the option of automatic engine start, but the consumer can implement it independently. To do this, he needs to additionally purchase and install the Starline 02-12 module.
Description of the contact elements on the main block of the device:
- the red contact is intended for connection to output 30 on the ignition switch;
- yellow is used to connect to the ignition line tap;
- green is for connecting to terminal 15/2 if the vehicle is equipped with two ignition lines;
- The blue contact is used to connect to the ACC output on the lock;
- a thinner yellow-black wire is needed to connect to contact element 50 on the switch;
- a thick cable in a similar sheath is designed to power the starter mechanism.
A 12-volt voltage is generated at output 50 of the ignition switch. A relay installed inside the autostart module begins to power the starter mechanism. It closes contact elements numbered 30 and 50. It is not allowed to connect the module without breaking the electrical circuit of the starter device.
Pinout of low current block:
- the black contact is used as a negative one to power the unit;
- the wire in a gray-black sheath is the input for monitoring the operation of the power unit; it must be connected to the battery charge indicator or tachometer;
- The lilac-orange output must be connected to the limit switch of the parking brake lever;
- the pink contact must be connected to the control output of the anti-theft system;
- the red-black contact is an output on the immobilizer bypass device, it is activated only during automatic start;
- the wire in the gray-orange sheath can be left untouched;
- The black and yellow contact is an output that is activated when the ignition is turned on and the starter mechanism is turned off.
Inside the autostart module body there is a set of toggle switches and switches, each of which must be set to a specific position:
- Operating time of the starter mechanism. If the toggle switch is set to Off, then this indicator will be 0.8 seconds, if in On, then 1.8 seconds.
- Method of controlling the power unit. If in the Off position, then according to the tachometer, if in On, then according to the contact elements, to which 12-volt voltage is supplied after the engine starts.
- Algorithm for activating power at terminal 15/2. If in the Off position, then when the starter mechanism operates, power will remain on the device. If it is On, the power supply stops. The second option is the most common.
- Transmission type. Initially, this toggle switch is set to Off; this is an automatic transmission. It should be left like that.
- Ignition delay time before starting the power unit. If the toggle switch is set to Off, this indicator will be less than one second, if On, then several seconds.
- The service switch must be left in the Off position.
Activation of security mode
In the Twage model, the user himself assigns buttons to enable the protection function. Therefore, activation is carried out taking into account which key was selected to control this mode.
If your communicator is broken or lost, you can enable protection using the service key:
- The key is inserted into the lock and the ignition is activated. The button to enter the service mode is clicked 4 times.
- Then the ignition is turned off. The siren should play one signal, after which the car's lights will flash.
- Within 20 seconds, the driver must leave the vehicle and lock all doors with the key. The siren will sound once, and the communicator will play a melodic signal.
- 20 seconds after the actions are completed, the protection mode is activated. The car headlights will blink once and the status indicator LED will flash.
Disabling security mode
One of the control buttons can be used to turn off the protection function. The purpose of this option is selected by the user. If the remote control is lost or broken, the Valet service button can be used to disable the security mode.
The deactivation procedure is carried out as follows:
- The car doors must be unlocked with a key. The security complex will start the siren. An icon in the form of an open lock will appear on the key fob display.
- The key is installed in the lock and turned. Once the ignition is activated, there is no need to start the engine.
- To disable the protection mode, the user needs to know his personal PIN code. To enter the first digit of the password, the Valet button is pressed several times. The number of clicks corresponds to the first character.
- The key is turned to turn off the ignition. Then it turns on again.
- The steps to enter the PIN code are repeated, only now you need to enter the second digit.
- The ignition is turned off. If the password is correct, the siren will stop working. Protection mode will be disabled.
The “AVTOservis Nikitin” channel talked about deactivating the protective function using the service key.
Download installation and operating instructions in PDF format
You can download service documentation for setting up and managing the alarm using the links in the table.
Advantages and disadvantages of the system
The advantages of this model:
- Possibility of implementing the automatic start function. If the additional Starline 02-12 module is correctly connected, the user will be able to control this option via a command sent from the communicator. It is also possible to implement functions for alarm clock, timer and temperature in the car interior.
- Convenience and ease of installation. If you use the service manual, the user will be able to independently install the security system.
- Affordable price. Today this model is not produced, but you can find stores that have it in stock.
- Good range of work of the communicator. The presence of long-distance communication will allow the user, being at a considerable distance from the car, to find out about the status of the alarm.
- Two power unit locks. Thanks to this, the engine will be stopped if there is an unauthorized attempt to start the internal combustion engine.
Flaws:
- High sensitivity shock controller. To prevent false alarms from the system, this parameter must first be configured correctly.
- The microprocessor module may not work correctly or fail if it overheats. High temperatures can be detrimental to the unit. Therefore, it should not be installed where it is exposed to sunlight.
- The system package does not include a siren.
- Fragile keychain. With prolonged and careless use, the key fob body may become damaged.
What is the price?
The approximate price of the security complex is shown in the table.
Video “Overview of the capabilities of the Twage A6 anti-theft system”
User Yaroslav540 briefly described the main features of the Starline security system.


Connecting the 16-pin connector
central block
Red wire – power plus, connect to the +12V terminal of the battery,
ensuring good contact.
Black wire – power supply minus, connect to the car body,
ensuring good contact.
Yellow wire - connect to terminal IGN1 (15/1) of the ignition switch, on
which when the ignition is turned on, a voltage of +12V appears.
Green-Yellow and Green-Black wires – connect to the lamps
side lights or direction indicators. Maximum load current 7.5A.
The gray wire is the positive control output for the siren. Maximum
load current 2A.
Blue-red wire - connect to the door push-button switches,
closing to +12V when the doors are opened.
Blue-black wire - connect to door switches,
closing to the body when the doors are opened.
Orange-gray wire - connect to the hood switch,
closing to the body when the hood is opened.
Orange/White Wire – Connect to the trunk push button switch,
shorting to the body when opening the trunk.
Yellow-black wire – negative output of additional channel No. 1.
programmable from 1 to 60 seconds or until the channel is turned off by the key fob (“mode
latch"). The channel can be used to control a solenoid
unlocking the trunk or to control additional equipment
Yellow-red wire – negative output of additional channel No. 2.
Maximum load current 300mA. Output pulse duration
latch"). The channel can be programmed to implement 2-step
unlocking doors or controlling additional equipment
car. An additional relay is required for connection.
Yellow-white wire – negative output of additional channel No. 3.
Maximum load current 300mA. Output pulse duration
programmable from 1 to 60 seconds or until the channel is turned off by the key fob (“mode
protection with the engine running") or depending on the duration
operation of the turbo timer mode. The channel can be used for control
additional vehicle equipment or to support +12V on
contact IGN1 (15/1) of the ignition switch when the engine is running in security mode and
in turbo timer mode. An additional relay is required for connection.
Blue wire – negative output of additional channel No. 4.
Maximum load current 300mA. The channel can be programmed for
turning on the interior lighting or controlling the power windows. For
Black-red wire – negative engine blocking output (NR/
NC relay contacts are programmable). Maximum load current 300mA. For
connection requires an additional relay.
Orange-violet wire - negative status control input
parking brake or foot brake pedal. No negative
potential on this wire in security mode will trigger
alarm, and when the engine is in security mode, it stops.
Connection options for the orange-violet wire are shown in the pictures.
Attention. When choosing the connection method for the orange-violet wire
It is necessary to take into account how the functions in which
The brake control input is involved.
function No. 2 - automatic control of door locks - in one of the options
involves closing the locks when you press the brake pedal or
releasing the handbrake;
function No. 8 - algorithm of operation of blocking outputs when the mode is turned on
anti-robbery - in one of the options you can select when the engine is blocked
activated after pressing the brake pedal;
function No. 16 - additional operation algorithm. channel No. 2 (yellow-red wire) -
in one of the options this input is used as the ignition pickup condition. IN
In this case, it is recommended to use the connection only to a manual
brake
Connecting the Built-in Engine Interlock Circuit
One blocking relay is installed on the board of the central alarm unit
with one group of switching contacts. Maximum switchable
current through relay contacts - 25/30A. Before connecting the relay, program
one of two possible options for its operation (function 10). At the factory
option 1 is programmed - NC type of relay contacts. After programming
you need to turn the security mode on and off.
Break one of the standard engine starting circuits. Into the chain break
connect two of the three switching contacts of the built-in relay
blocking using blue and blue-white (thick) wires
from the alarm kit.
Break one of the standard engine starting circuits and open the circuit
connect an external relay. Program one of two possible
options for its operation (function 10). Factory setting - NC contact type
(option 1). An example of a connection diagram is shown in the figure.

+12V support circuit on the ignition switch during operation
engine in security mode and turbo timer mode

Additional channel No. 1 can be used to control unlocking
trunk An example of a connection diagram is shown in the figure

connecting to the low beam headlights and implementing the “light path” function.
An example of a connection diagram is shown in the figure.

Additional channel No. 4 (blue wire) can be used for
connection to interior lighting and implementation of the “polite” function
interior lighting. An example of a connection diagram is shown in the figure.

Connection to central locking system
The StarLine Twage C6 alarm system has built-in control relays
central locking The relay contacts are routed to a 6-pin connector.
The load capacity of the built-in relays is 15A. Manager duration
pulses are programmable (function 1).
Connection diagram to the locking system with positive
or negative control

Connection diagram for two-wire drives
locking systems


for two-step door unlocking

StarLine Twage C6. This price is valid for all Japanese and European cars that do not have a CAN bus
tarLine Twage C6 is a new generation signaling model, developed in 2008, with a two-way communication channel. The new original key fob with feedback and LCD display has a 70% increased warning range compared to series A and B systems. The original SLD Military™ dialog code is used for control.
The full list of security and service capabilities of StarLine Twage C6 includes more than 50 functions: turbo timer mode, 2-step engine unlocking when the security mode is turned off, a programmable interface for connecting various security sensors (shock, tilt, pressure, microwave, ultrasonic, etc.), several options for emergency alarm deactivation with the ability to set a 1, 2 or 3-digit personal code, a convenient programming algorithm with indication of the number and status of the variable function on the LCD indicator of the key fob with feedback, 4 additional control channels with programmable operating algorithms and much more.
Equipment:
Since October 2008, sales of the new C series of the StarLine trademark began. The new series consists of 3 models: C4, C6 and C9.
One of the main features of all new models of the “C” series is the presence of the SLD Military dialog code, which is resistant to electronic hacking, which is based on the principle of “friend or foe” identification. The individual cryptographic digital key used makes the code for each system unique. This prevents its unauthorized opening.
All new models can work in conjunction with the StarLine Space and StarLine Messenger modules, which allow you to control alarms via a cellular communication channel, receive alarm messages on the owner’s phone and receive data on the vehicle’s location.
Main advantages
- Increased by 70% compared to the B series, the range of receiving warning signals
- Automatic control of the location of the key fob in the reception area
- Automatic adjustment of the shock sensor according to the desired test impact (model C4)
- Possibility of implementing the remote start function on any car, including cars with a smart start button (model C9)
- Availability of a turbo timer mode in a system without an engine start function (model C6)
- Ease of implementation of remote start. Added a method for monitoring the engine “by noise” (model C9)
- On-line programming of key fob functions. Added the ability to temporarily disable vibration alerts. Added the ability to enable or disable power saving mode to increase battery life
- Compatibility of basic security and service functions with B6 and B9 systems
Table of main differences between models C4, C6, C9
Functions and design StarLine C4 StarLine C9 Alert channel range up to 2000 m up to 2000 m up to 2000 m Control channel range up to 600 m up to 600 m up to 600 m Built-in engine blocking relay - There is There is Possibility of connecting digital blocking relays - There is There is Connecting GSM/GPS modules StarLine Space and Messenger There is There is There is Number of additional control channels 2 4 4 Adjusting the shock sensor automatic manual separately by level manual separately by level
Instructions
Technical characteristics of StarLine C6
Carrier frequency of radio control signal...................................433.92 MHz
Maximum range of the key fob in transmitter mode.......... 600 m*
Maximum range of the key fob in pager mode.................. 1800 m*
Maximum range of the key fob without feedback.................. 15 m*
Shock sensor type........................................................ ............... piezoelectric
Working temperature................................................ ......... from –40 to +85 °C
DC supply voltage................................................................... .... 9-18V
Current consumed by the alarm system in security mode...................... less than 15 mA
Maximum permissible current at the outputs:
· siren connection circuits........................................................ ........................... 2A
· side light connection circuits.................................................... .... 2x 7.5A
· control circuits for electric door lock drives.................................... 15A
· engine blocking circuits......................................................... ................... 25/30A
· circuits of additional control channels.................................................... 300 mA
Power supply of the main key fob........................... 1.5V (1 AAA battery)
Power supply for additional key fob................ 3V (1 battery type CR2032)
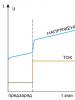
* The range of the key fob and pager may be reduced depending on the location of the transceiver, the location of the vehicle and the user, radio frequency interference, weather conditions, vehicle battery voltage and key fob battery voltage. StarLine C6 car alarms are approved for use in the Russian Federation and comply with all requirements of regulatory documents of the Russian Federation. The service life of StarLine Twage car alarms, established by the manufacturer, is 5 years, provided that they are installed and operated in strict accordance with these instructions.
Protected areas of the car and methods of protecting them
· Engine – from start (conventional relays / StarLine DRR digital radio relays)
· Doors, hood, trunk - from opening (push-button switches)
· Parking brake – from off (push-button switch)
· Body, wheels, windows – from shocks and shocks (two-level shock sensor)
· Ignition – from switching on (voltage control input on the ignition switch)
Security of StarLine C6 alarm
· Original dynamic control code, protected from selection and
interception by dialogue encoding algorithm “friend or foe”
· Remembering the original state when the power is turned off and returning to the same
state when power is restored
· Limitation of the number of alarm cycles from sensors
· Interrupt alarms without disarming the security mode
Security and anti-theft functions of the StarLine C6 alarm system
· Enabling alarms when sensors are triggered in security mode
· Providing alarm alerts to the key fob with feedback
Immobilizer mode
Anti-robbery mode
Turbo timer mode
· Programmable 2-step engine lockout
· Programmable personal emergency shutdown code
· Engine blocking and its preservation when dismantling the alarm system
Self-diagnosis and indication of operating modes
· Automatic control of the location of the key fob in the reception area
· Automatic control of security sensors with disabling of faulty ones
and a message about it
· Indication of alarm status by LED and on the key fob display
· Indication of reasons for alarm activation in 9 security zones
· Indication of a faulty zone when the security mode is turned on
Indication of the fact that the alarm has been triggered by sound signals
· LED indication of serviceability of limit switches
· Open door light alarm